Parsnip & bean dip

One of my favourite times of the day is that point where the day’s work is done, supper is on the hob and you can sit down to relax with a glass of something refreshing and a few nibbles. Unless we have guests, I rarely prepare anything elaborate (see my post on snippets for fancier occasions), but some nuts or a tasty dip with a few crudités or tarallini (these fennel-seed ones are addictive) are perfect to keep you going until food is on the table. So I’m always on the lookout for new recipes for dips.

I thought the combination of parsnips and beans could be a bit bland, but roasting the parsnips with garlic, the addition of hazelnuts and the caramelised tomatoes mean this is so tasty that we have served it to foodie friends as a first course to acclaim. Don’t be alarmed about the whole head of garlic – the flavour is much gentler once it has been roasted in the oven. And yes, it does need all that lemon juice!

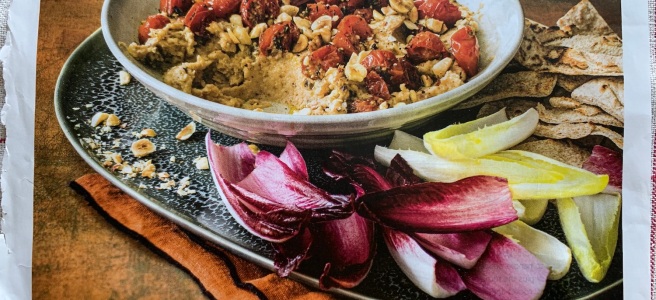
The recipe is from the Waitrose magazine, and they say it serves 4, but I reckon it serves 6-8 as a starter. It will keep for a day or two in the fridge, but not much longer. I forgot to take a photo, but here’s a snap of the image from the original recipe to give you an idea.

  • 500g parsnips
  • 2.5 tsp olive oil
  • 1 small bulb garlic
  • a few sprigs of rosemary or thyme
  • 1/4 tsp chilli flakes
  • 225g baby plum or cherry tomatoes
  • 60g blanched hazelnuts
  • 400g can butter beans
  • juice of 2 lemons
  • Chicory leaves and flatbread or other bread to serve

Preheat the oven to 175C fan. Peel the parsnips and cut them into 2cm slices – I cut the fat slices from the top in half too. Put in a baking dish in a single layer and toss with 1tbsp olive oil. Season with salt and pepper and push the whole head of garlic in the centre. Cover with foil and roast for about 30 minutes.

Put the tomatoes with the rosemary or thyme, chilli flakes and a tsp of oil into another tin and add them to the oven once the parsnips have had about 15 minutes. They should take about 20 minutes to become soft and caramelised. Check the parsnips and if necessary give them another 5 minutes without foil – they do need to be tender to the point of a knife.

Put the hazelnuts on a small baking try and toast them in the oven for 7-8 minutes (no more – they catch easily). Roughly chop 20g of the hazelnuts and set them aside.

Once the parsnips and tomatoes are done take them out of the oven and leave to cool a little while you squeeze the cloves of garlic out of their papery skin (use rubber gloves if you’re worried about having garlicky hands). Put the remaining 40g of hazelnuts into a food processor with the roasted parsnips and garlic, drained butterbeans, the remaining tbsp or so of olive oil and most of the lemon juice.

Process for 3 minutes, scraping down the bowl of the food processor as necessary. Taste and add the rest of the lemon juice, or a little more oil, salt or pepper as needed. Give it a final whizz, then turn into a large shallow bowl or platter. Arrange the roasted tomatoes on top, with all their delicious caramelised juices, and top with the chopped hazelnuts.

Serve with chicory leaves to scoop it up, flatbreads, pitta or sourdough.

Chicory, watercress, pear & walnut salad

This recipe adapted from Raymond Blanc’s website has become one of our favourite winter salads. I can commend it to anyone looking to use up the last of their Christmas stilton as, although it is particularly nice with Roquefort, it also works well with other varieties of blue cheese. I have used St Agur, Gorgonzola picante and, yesterday, Stilton, all to good effect. The cheese for the dressing really needs to be at room temperature to make it easier to cream with the tepid water, but keep the cheese for the salad cold in the fridge ready to be crumbled over at the end. The pear should be ripe but still firm – better too firm than too soft for this recipe.

I have added watercress to the original recipe, as I love the taste of it and think the dark leaves complement the pale chicory and cheese. The salad looks particularly pretty if you use a mixture of white and purple chicory, but this is far from essential. We were out of chives yesterday, but they are definitely worth including. Serves two (or four as a starter, should we ever be able to entertain again).

For the dressing

  • 25g Roquefort or other blue cheese
  • 20g tepid water
  • 1/2 tbsp white wine vinegar
  • 1 tbsp extra virgin olive oil
  • ground black pepper

For the salad

  • 2 small or 1 large head of chicory
  • 50g watercress
  • 50g walnuts
  • 1/2 medium Conference pear
  • 1/2 stick celery
  • 20g Roquefort
  • 1 tsp chives

To make the dressing cream the Roquefort or other blue cheese to a smooth paste in a large bowl using a spatula. Mix in the warm water and white wine vinegar and whisk until smooth. Then whisk in the olive oil little by little until well amalgamated. Season the dressing to taste with freshly ground black pepper. You shouldn’t need any salt as the cheese will make the dressing quite salty already.

To assemble the salad, wash and quarter the chicory lengthways and, if you are using a large head, cut the pieces in half again. Peel the pear if you don’t like the skin, and slice it thinly lengthways then across in half again if the pieces are rather large for a forkful. Finely slice the celery. Pick and wash the leaves of the watercress and spin them dry in a salad spinner or clean tea-towel. If you have time, toast the walnuts briefly in a dry frying pan before roughly chopping them. Finely chop the chives.

Add the chicory, watercress, walnut, pear and celery to the dressing in its bowl and turn gently to mix them together. Crumble two thirds of the cold Roquefort into the salad and toss it again before arranging on two plates. Crumble over the remaining blue cheese and sprinkle with the chopped chives.

Squash caponata

I thought I should start the New Year as I intend to go on, after too long a gap, by sharing this recipe, which has already become a keeper. Here’s to enjoying more delicious food in 2020…

I have always liked caponata, so when I spotted a recipe by Anna Jones for a winter version made with roast squash I immediately tore it out of the Guardian Feast section to try. It was so delicious that I made it on repeat at home, and then again when I went to stay with my vegan brother. It is blissfully easy to make, and can be eaten as a vegan main course, with a salad and good bread, as a starter or side dish.

I think the flavours are best when it is eaten warm or at room temperature, but it is good hot from the oven too.  It keeps well in the fridge for a few days and is also really easy to scale up and down, whether to make enough for a crowd or just use up that piece of squash that has been lurking in your veg drawer. 

  • 2 tins plum tomatoes
  • 1.1kg squash (or pumpkin)
  • 3 medium red onions
  • 4 garlic cloves
  • 4 tbsp basalmic vinegar
  • 3 tbsp olive oil
  • 50g black olives
  • 3 tbsp capers
  • 50g raisins
  • 20g parsley

Heat the oven to 240° C/220° C Fan/Gas 9. Peel and deseed the squash, and chop it into roughly 2cm chunks. Peel the onions and cut each into six pieces. Peel the garlic cloves and squash them with the side of a knife.

Empty the tinned tomatoes into a large baking tray, breaking them up with a spoon or your hands (you can use tins of chopped tomatoes if you prefer, though you lose a bit of texture). I still use my mother’s sturdy roasting pan for this sort of dish. Add all the prepped vegetables, then drizzle over 3 tbsp each of basalmic vinegar and olive oil and grind over some salt and pepper. Put into the oven and roast for 35 minutes. 

While it is cooking pick off the leaves of the parsley – they are part of the salad, rather than a garnish, so don’t stint or chop them. When all the roasted vegetables are soft and starting to char at the edges add the olives, capers and raisins, mix well and return the pan to the oven for 15 minutes.

When the caponata comes out of the oven stir through the remaining 1 tbsp of vinegar and the parsley leaves. Either serve straight away or leave to cool a little. I hope you enjoy it as much as I did. Happy New Year!


Carrot and bean dip

I was prompted to post this by my friend Sue, who asked me for the recipe after we made it during our holiday in the Auvergne. It is very easy to whip up and is a pleasant change from ordinary houmous. Irene originally found a recipe for it online, but we could never find that recipe again, so this is a reconstruction, informed by some online browsing.

If you’re pushed for time you can boil the carrots rather than roasting them, though roasting does give a sweeter flavour, and it is incredibly easy, especially if you pop them into the oven when you’ve got it on to cook something else. You could use crushed raw garlic, if you prefer.

This quantity makes enough to accompany drinks for 6 and, as part of a selection of four different nibbles or snippets, it was enough for a drinks party for 20 last night.

  • 1 tin cannellini or butter beans
  • 3 carrots
  • 2 cloves of garlic
  • juice of ½ lemon
  • 1 tbsp tahini
  • 4 tbsp extra virgin olive oil
  • 1 tsp cumin seeds
  • 1½ tsp coriander seeds
  • sea salt and black pepper

Heat the oven to 180°C (or thereabouts – just adjust the cooking time if you’re cooking them with something else that needs a slightly different temperature). Scrub or peel the carrots, trim the ends and cut into rough chunks. Sling into a roasting pan with the garlic, a drizzle of olive oil and some salt and pepper. Roast for about 20 minutes until tender to the point of a knife, then put into a bowl (if you’re using a stick blender) or the food processor. Alternatively, boil in lightly salted water for about 10 minutes.

Heat a small frying pan over medium heat. Toast the cumin and coriander seeds, shaking the pan occasionally, for a few minutes until you start to smell them (do not leave them, as they can burn quickly). Tip out, allow to cool for a few minutes, then crush to a powder in a spice mill or mortar and pestle. You can, of course, use ready ground spices if you haven’t got seeds or are in a rush – but it really is worth the bother if you have time.

Drain the tin of beans and tip into the bowl or food processor on top of the carrots. Add the lemon juice, tahini, 3 tbsps olive oil, ground spices and a good grind of black pepper. Squeeze the garlic out of its paper cases (or peel and crush in a garlic press if you’re using it raw) and pop that in too. Then blend or pulse until you have a puree – you can decide how rough or smooth you prefer it. Taste for seasoning – you may need more oil, salt or lemon juice.

If you’re feeling a fancy you can add some chopped parsley or coriander as a garnish. Serve with bread sticks, crackers, flat bread or – my current favourite – fennel tarralini for dipping.

Thanks to Sue for prompting me to post the recipe and for all the (very professional) photographs.

In September 2023 Waitrose magazine published a similar recipe by Ed Smith for Cumin & Honeyed Carrot Houmous which roasts 650g carrots, dressed with cumin and olive oil, at 200 fan, blends half of them with most of the chickpeas and tahini, but continues to roast the rest of the carrots and chickpeas, drizzled with honey, and serves them on top of the dip, topped with sunflower seeds and paprika. A slightly more substantial dish, which would work well as a part of a group of small plates or a starter.

Nibbles, snippets or canapés

What do you call the small savouries served with drinks before dinner or at a cocktail party? Nibbles seems to be the most common description on menus for things like olives and nuts these days, but I first knew them as canapés or appetizers. In Spain they are, of course, tapas or pinchos, in Venice chicchetti. Then last week, when I was looking for ideas for celery and cheese canapés in a Katy Stewart cookbook of 1983, I found them described as cocktail snippets, a name I had never come across before. When I looked online to see whether the term had wider currency, I found a wonderful extract from The Reluctant Hostess. This priceless 1950s guide to entertaining etiquette by Ethelind Fearon was reissued a few years ago. Although I wasn’t tempted by many of the recipes, it is very amusing and full of down-to-earth advice on giving a cocktail party. So henceforth canapés will be referred to as snippets!

After all that, what snippets did I make? My dinner guests included one vegetarian and one pescatarian, so meat was out. The idea that led to my discovery of snippets was to have celery sticks stuffed with cream cheese and walnuts. After reading several recipes, this was what I made:

100g cream cheese
2 tbsps cream
pinch cayenne pepper
100g walnuts
handful flat-leaf parsley

Combine about 100g of cream cheese with 2 tablespoons of cream, then add a good pinch of cayenne pepper, salt and a grind of black pepper. Set aside 8 nice walnut halves, and finely chop the remainder (but see below). Finely chop the parsley and mix into the cream cheese with the chopped walnuts.

Wash 3 or 4 celery sticks and use a knife to peel off any tough strings, then slice a very thin bit off the outside of the stick so that its sits flat (thank Katy Stewart for that tip). Fill the  pieces of celery with the cream cheese mixture, cut into 5cm sections and top each one with half a walnut. The chopped walnuts made it tricky to fill smaller celery sticks, so next time I might opt for a 50/50 mixture of  cream cheese and blue cheese, or just well-flavoured cream cheese with a walnut on top.

I made a batch of Rachel Cooke’s wonderful Parmesan biscuits, as they are always popular (I always think I’ve made enough to have leftovers but there are rarely any left).

When I was in Manchester I had bought a packet of fabulous white anchovies, boquerones, from the excellent Catalonian delicatessen Lunya in Deansgate (there is also one in Liverpool). Boquerones are milder than the usual dark, salty anchovies, and have a lemony taste. Several recipes for making boquerones included parsley so, after carefully separating the fillets and blotting some of their oil on kitchen paper I covered the skin side with finely chopped parsley, wrapped them in pinwheels and secured with a cocktail stick.

Finally, we had a dish of lovely crisp French breakfast radishes, and some smoked salmon on thinly sliced sourdough. This selection of snippets went very well with a chilled bottle of champagne and some crisp rosé, with enough choice for vegetarian and pescatarian alike, and they were not too much work to prepare. As you can see, most of them got eaten before I got round to taking a photograph!

While I’m on the subject, my other tried and tested snippet recipes are:

Basil, mozzarella and tomato on cocktail sticks

Devils on horseback (soft prunes wrapped in half a rasher of streaky bacon and cooked for 15-20 minutes in the oven at around 175 C fan/190 C).

Butter bean dip with dukkah and crudités

Not forgetting olives, marcona almonds and cheese straws.

Bon appetit!

Escalivada or Catalan roasted vegetables

Eating Escalivada reminds me of long holiday lunches while staying with my friend who has a flat by the beach in Llançà in Catalonia. It is so simple to make, yet the combination of roasted vegetables is just right, making a delicious starter, light lunch or a side dish that seems to go with everything.

Yesterday we had it with a dish of warm lentils, rocket salad and an oozingly ripe goat’s cheese. The only thing it demands is a bit of advance planning, as the vegetables need to cook quite slowly in the oven. This quantity serves 4 as a starter or part of a main course. It keeps well in the fridge, so it’s worth doing more than you need,  providing an instant hit of sunshine for supper later in the week.

1 red pepper
1 yellow pepper
1 medium onion
1 aubergine
olive oil
2 tsp sherry vinegar

Heat the oven to 190ºC/Gas mark 5 – though if you were cooking something else at 180ºC/Gas mark 4 that would be fine too; they would just take a bit longer to cook. Wash the peppers and aubergine. Cut out the stems of the peppers and pull out the fibrous inside and seeds. Slice off the top of the aubergine, and pierce it a few times with a knife (to avoid explosions in the oven). Cut the onion into two (or four if it is fat) – no need to peel it.

Put all the vegetables into an oven dish and rub them with olive oil (except for the onion skin). Sprinkle with a little salt and cover tightly with foil. If you prefer you can wrap the vegetables individually in foil, but this strikes me as more trouble than is necessary. Roast for an hour, then check how they are doing – you need to roast them until they are really soft and starting to collapse. They will probably need another 30 minutes, and I took the foil off for the last 15 minutes to speed things up.

When the vegetables are all really soft take them out of the oven and leave until they are cool enough to handle. Then peel the skin off the peppers and aubergine – it should just pull away really easily. Extract any remaining seeds or fibres from the peppers – the only remotely fiddly part of the recipe. Slice the vegetables into long pieces about 2-3 cm wide and arrange on a platter. Pull the pieces of onion out of their skin, cutting them away from the root, and slicing them in half lengthways if they are too large to fit on a fork. Add them to the platter. Drizzle with olive oil and sherry vinegar, and season to taste. Serve at room temperature.

Escalivada is a great accompaniment to fish or lamb or chicken, or you can simply eat it with some good bread and a glass of wine. And pretend you are by the sea in Catalonia…

Roasted cauliflower and hazelnut salad

img_2207At the farmer’s market in Marylebone last weekend I bought a beautiful big cauliflower, and then had to go on a search for good things to do with it. This Ottolenghi recipe from Jerusalem roasts the cauliflower, giving it a really nutty taste which is accentuated by the toasted hazelnuts, with celery and parsley bringing freshness and crunch. I only used half the cauliflower, as it was so big, (this is what I did with the rest of it) and have adjusted the quantities in the original recipes a little.

Eating cauliflower as a salad always reminds me of the first time I was served warm cauliflower dressed with a mustardy vinaigrette (do try it*) at the house of a friend whose mother was of French and Russian extraction;  both she and her food seemed terribly glamorous. I first had clafoutis there too.

This salad is good as a starter, as a main with, say, other grilled vegetables or chick pea salad or as the accompaniment to, for example, grilled mackerel. This quantity feeds 3 or 4 depending on how you’re serving it.

1 small or half a large head of cauliflower, broken into florets or thickly sliced (approx 450g)
3 tbsp olive oil
1 stick of celery
20g hazelnuts
small bunch flat-leaf parsley
40g pomegranate seeds (approx ½ a small pomegranate)
¼ tsp ground cinnamon
¼ tsp ground allspice
1 dstsp sherry vinegar
1 tsp maple syrup
salt and black pepper

Preheat the oven to 220 C/200 C Fan. I tend to slice the cauliflower, after having cut the florets away from the main stem, which gives pieces with an attractive tree-shape, and avoids the difficulty of trying to get neat florets of the same size.

img_2210Mix the cauliflower with 2 tbsp of the oil in a large roasting tin, spread it out and add salt and pepper. Roast for 25-35 minutes until the cauliflower is tender, with some brown crispy bits. Tip into a large mixing bowl and leave to cool. Meanwhile trim the ends of the celery stick and slice it on the diagonal into pieces about 0.5 cm thick. Wash the parsley and pick off the leaves.

Turn the oven down to 170 C/150 C Fan. Spread the hazelnuts on a small baking tray and roast until the skins are dark brown and cracking, which took 12 minutes in my oven, but can take another 5 minutes. I usually give the pan a shake at half time, and you do need to watch them carefully so they don’t burn (really the only remotely tricky bit of this recipe). When the nuts have cooled enough to handle, tip them into a tea towel and rub off the skins, then roughly chop them.

img_2211Add the nuts, celery, parsley, pomegranate seeds, 1 tbsp of oil and the other dressing ingredients to the dish of cauliflower and turn carefully to mix. Check the seasoning and serve at room temperature.


  • If you want to try cauliflower in vinaigrette, just trim away the leaves and any extra stem, steam the whole head until just tender and then pour over a vinaigrette made with dijon mustard, white wine vinegar and olive oil. Much more delicious than it sounds, and it looks striking when served too.

Smoked mackerel pâté

Smoked mackerel pateHere’s a quick, easy snack or starter for you. Smoked mackerel pâté is a classy take on a humble ingredient and is absolutely delicious with seeded crisp bread or, even better, hot toast. Pumpernickel bread also goes well. It is the perfect way to use up the end of a packet of smoked mackerel.

I always used to make it with cream cheese and curly parsley, but in looking for a recipe found options with ricotta or fromage frais, which make a lighter pâté, and complement the flavour of the mackerel perfectly. If you’re using horseradish you’ll need the grated hot horseradish that you can get in a jar (or fresh, of course), rather than horseradish cream, which won’t give you that kick of flavour.

150g smoked mackerel fillets
100g fromage frais or ricotta
3 tbsps double or sour cream or crème fraîche
1 tsp horseradish (optional)
a good squeeze of lemon juice
black pepper
A handful of flat-leaf parsley, finely chopped
Lemon wedges, watercress or capers to garnish (optional)

Carefully skin the mackerel fillets and check for any stray bones. Break up into a bowl and mash with a fork. Beat in the fromage frais or ricotta, then the cream and horseradish. Season to taste with lemon juice and black pepper – I think it needs quite a lot of both – and stir in the parsley. Serve with lemon wedges, and watercress or capers are nice as a garnish too.

Avocado, spinach and bacon salad

I have been running to catch up with myself since a most enjoyable holiday in the States last month, so have been rather neglecting the blog. A lot of good eating has been going on, though, including several classic American brunches, one ending with this very indulgent affogato Affogato in Philadelphiaand chocolate cake.  Back home it has been a question of throwing together familiar meals on the trot, with not much time to try new recipes or photograph what I’ve been cooking.

As the weather has shifted gear, salads are back on the menu, and this is a classic – a quick, easy meal in a bowl, combining creamy avocado and the salty tang of bacon. If you can, use thinly sliced bacon for this recipe, so you can get it nice and crisp, to contrast with the soft leaves. Purists would omit the red pepper and the rocket or watercress, but I like the cheerful colour of the red pepper and the peppery kick of flavour that the other leaves bring. A small head of chicory – red for preference – is also a good addition instead of or as well as the rocket or watercress – just slice it across into three or four pieces and separate the leaves.  These qualities are for 2, served with good bread. Add a dish of warm lentils dressed with olive oil and lemon if you want to make it into a more substantial meal.

Avocado, spinach and bacon salad
4-6 thin rashers of bacon
200g spinach
handful of rocket or watercress
½ red pepper
1 avocado
30g pine nuts

Dressing
½ tsp dijon mustard
salt & pepper
1 tsp white wine vinegar
2 tbsp olive oil

Heat a frying pan with a drizzle of olive oil and cook the bacon over a medium heat for about 6-10 mins (depending on the thickness of your rashers) until it is nice and crisp. I used six rashers of bacon, as they were very small and thin. Meanwhile, wash the spinach and rocket or watercress and dry in a salad spinner (or shake in a tea-towel). Slice the red pepper thinly and chop into 2cm pieces. Cut the avocado into chunks. Toast the pine nuts in a small frying pan over medium heat – this should only take 2 or 3 minutes, but do watch them like a hawk, shaking and turning them so that they don’t burn.

When the bacon is ready, take it out of the pan and drain on a piece of kitchen towel. Put the drained salad leaves into a large bowl, and add the avocado and most of the red pepper. Whisk together all the dressing ingredients, pour over the salad and mix together. Finally, crumble the bacon and sprinkle it over the salad, with, the remaining red pepper and the pine nuts. I usually finish it with a tiny drizzle of oil and another grind of black pepper.

Fennel and blood orange salad

Fennel and blood orange saladI love the dramatic colour of blood oranges (or blush oranges, as they seem to have been renamed in Waitrose – why?), and this salad shows them off to perfection. It is very simple, but looks great, can be prepared an hour or so ahead and is such a good combination of flavours, especially at this time of year when one is desperate for fresh flavours and crisp textures after all the cold-weather comfort food we have been eating.

This salad is the ideal starter before a substantial main course, but I think it would also work as a side with something like duck breast, or a lentil salad. Good vinegar is essential – the sweet-sharpness of sherry vinegar is a great foil to that of the oranges. Serves 4

2 heads fennel
3 large or 4 small blood oranges
salt and pepper
3 tbsp olive oil
2 tsp sherry vinegar

Trim the fronds from the fennel, chop them finely and put on one side. Trim off the stalks and base of  the fennel bulbs, sit them upright and cut downwards into very thin slices. Arrange onto the four serving plates – I found I didn’t need all of the fennel to make four servings – drizzle over the olive oil and season with salt and pepper.

Fennel and blood orange saladUsing a serrated knife cut away the peel from the blood oranges. I cut off the top and bottom first, then work in strips cutting down and round the orange, keeping the knife as close to the pith as possible – a serrated knife really makes this much easier. You want to get rid of all traces of pith without losing too much flesh or juice. Then slice the oranges across into 0.5 cm slices and arrange five or six slices on top of each plate of fennel, removing any pips or pith from the centre as you go. Drizzle ½ tsp of sherry vinegar over each serving of oranges and sprinkle with the reserved fennel fronds. A final grind of black pepper and you’re ready to serve, ideally with some good sourdough bread. If you wanted extra greenery, some rocket might make a good addition.