Damson jam

The damson tree on my balcony gives me much joy, from its early white blossom through to the seductive dark bloom of the crop. I am sure the little tree would prefer to have its roots deep in the earth but until the day when I manage to get an allotment I will try to keep it going in its big pot. As well as being delicious in crumbles and tarts, damsons make one of my favourite jams – not too sweet, yet darkly luscious on toast or crumpets and good in a bakewell tart too. Damsons have lots of pectin so I have found it straightforward to make. I also like using a mix of damsons and blackberries.

Damson tree in blossom

Given the size of my crop, I only make jam in small quantities – gone are the days of processing tens of kilos of damsons produced by the mature tree in a previous home. My tree is Farleigh, which crops late (mid-September), but this year I have picked the fruit rather early – they were starting to fall and I didn’t want to lose them to the pigeons. These quantities make two jars but can obviously be multiplied up if you have more damsons. I have kept some of mine back for the freezer for puddings later in the year. I have been experimenting with reducing the sugar content and have gone down as low as 360g, which was also fine, so adjust to suit your taste. Using less sugar probably means that the jam wouldn’t keep quite as well, so may not be a good idea if you’re making a big batch for the store cupboard.

You will need two jam jars with lids that have been sterilised for 20 minutes in a low oven or by being immersed in boiling water plus greaseproof circles for the top of the jam; decorative gingham tops and fancy labels are optional. However, what is important in my view is a thermometer. I’ve tried all that business with testing jam on saucers in the freezer and never found it satisfactory – by the time you’ve decided the stuff in the saucer is set the rest of it is over-cooked. If you want to make jam just splash out a fiver and get a thermometer. I find I use mine for lots of other stuff too (making custard for example).

  • 450g damsons (or mixed damsons and blackberries)
  • 400g granulated sugar
  • 75ml cold water

Wash the damsons and remove any stems or leaves. Put into a large metal pan with the cold water and bring up to a simmer. Cook for about 10-15 minutes until the fruit has burst and softened. At this point the stones should have released from the flesh and you will be able to see them swimming to the top of the mixture like little red fish. At this stage I pull the pan off the heat and leave it to cool down so that I can pick out the stones. You could sieve the fruit, but that gives you a different texture, and I find it easy enough to fish the stones out by hand – use a disposable glove if you don’t want stained fingers. I never manage to get quite all of them at this stage, but usually manage to spot the escapees later before they get into the jar. If I’m using blackberries too I add them after I’ve removed the stones, as they cook pretty quickly.

Reheat the fruit over a moderate heat and add the sugar, stirring assiduously until it has all dissolved. I use a heat-proof spatula to scrape any sugar or juice from the side of the pan back into the jam at this stage to be sure that there are no remaining sugar crystals.

Now turn the heat up, bring the jam to the boil and cook without stirring until it reaches 105C. This should only take 5 minutes or so with this quantity, so start testing the liquid with the thermometer after just a few minutes, keeping your hands well away from the scalding jam. As soon as it has reached temperature pull the pan off the heat and leave it to settle for 10-15 minutes, skimming off any scum.

Two jars of damson and blackberry jam

Set the sterilised jars on a tray, in case of spills, and carefully pour the jam into them. Cover with the greaseproof circles and lids and allow to cool. I keep this in the fridge once the jar is open.

Sweet potato cakes

These sweet potato cakes are dead easy to make, and perfect for brunch or supper. You could also make smaller cakes and serve them as a snack with some salsa or chutney. We had them for brunch with a poached egg on top and a fresh, crunchy salad. To keep it vegan, serve a sliced avocado or a good dollop of coconut yoghurt alongside the potato cakes instead of the egg. This is a very useful recipe when you have left-over roasted or boiled sweet potato – sometimes you can only get enormous ones, which are far too big to get through all at once.

The potato cakes are very soft – you could use more cornflour and chill them for longer if you want firmer, neater patties – but I don’t mind them being a bit wonky, and they held together fine in the pan. Adjust the chilli content to your taste, and chilli flakes would work too if you don’t have any fresh chilli. You could, of course, omit the ginger and chilli and use parsley and lemon zest instead of coriander and lime zest if you wanted a milder, more soothing brunch. Serves 2.

1 large sweet potato (about 300g)
2 spring onions
1cm ginger
1 clove garlic
1 red or green chilli
zest of 1/2 lime
6 sprigs coriander
1 tbsp cornflour
salt and black pepper
2 tbsps quick-cook polenta
1 tbsp olive oil

Salad
2 tomatoes
5cm cucumber
6 radishes
1 stick celery
Coriander leaves
juice of 1/2 lime
2 tbsp olive oil

To serve (optional):
2 eggs or 100g coconut yoghurt
1 avocado

img_5452-e1562515852774.jpg


Bring a pan of salted water to the boil. Peel the sweet potato and cut into small chunks. Add to the boiling water and simmer for 10 minutes until tender to a fork, then drain thoroughly in a colander.img_5453.jpg


Trim and finely chop the spring onions, peel and grate the ginger and garlic, de-seed and finely chop the chilli and put into a bowl with the zest of lime. Finely chop the coriander, including any soft stalks, and add that too. Tip the drained sweet potatoes into the bowl and mash them into the other ingredients.


Add the tablespoon of cornflour and mix well. Then spread the polenta onto a plate. Take a quarter of the mixture, shape into a pattie and dump on top of the polenta. Carefully turn it over (using a spatula helps) so that it is completely coated in the polenta.

img_5454.jpg


Move the potato cake onto a plate or board and do the same with the rest of the mixture to give four sweet potato cakes. Pop them into the fridge to firm up for a few minutes while you clear the decks, make salad and lay the table.


For our salad we just diced the vegetables listed and dressed them with lime juice and olive oil. Diced red pepper or red onion would also be nice, as well as or instead of the ones listed. Or you could just prepare a regular green salad.

img_5456.jpg

Heat the oil in a non-stick frying pan. If you’re having poached eggs put a shallow pan of water on to heat.

When the oil is hot use a spatula to transfer the potato cakes into the pan and leave to cook undisturbed – resist the urge to fiddle with them – on a medium heat for 5-7 minutes until the bottom is crisp and golden. Turn them over carefully with the spatula and cook the other side.

Slice the avocado, if having, and squeeze over a few drops of lemon or lime juice to stop it discolouring. If you’re having poached eggs, about 3 minutes before the potato cakes are ready crack each one into a cup and slip into just simmering water. Cook for 3 minutes or until done to your taste. Use a slotted spoon to scoop each one from the water and blot any excess moisture with a kitchen towel.

Serve the potato cakes with their sides and salad for a satisfying, spicy brunch.

Sweet potato cake and egg

Proper Porridge

Proper porridge with apple compote, blueberries, nuts and seeds

This is a public service post for everyone who hasn’t yet discovered that what you need to start the day on these cold dreary mornings, especially when you have a persistent dreary cold, is a big pot of proper porridge. By this I mean porridge made from oatmeal, which is no harder to make and has a better texture than any porridge made with ordinary porridge oats.

We first started using oatmeal to make porridge regularly after staying with our friend Pat in Pennsylvania. Her beautiful old Quaker kitchen has tall carpenter-made cupboards which, of course, house a big tin of local steel-cut oatmeal. Oatmeal porridge was also the regular breakfast on walking holidays in Scotland, but I rarely had to wield the spurtle myself. When I got back from the States, with a smart new set of American cup measures, I investigated available brands of oatmeal; some are distinctly pricy and not all supermarkets stock it. Working out the right quantities of oatmeal and water to give our preferred quantity and consistency, took a certain amount of trial and error too.

So these instructions come with a caveat – this is how we like our porridge so you may need to adjust the quantities or the proportions, if you like yours thicker or thinner – and two discoveries that make cooking porridge much easier. The first, learnt from my friend Luc in Glasgow, is to start the porridge the night before. It takes 5 minutes to measure oats, water and salt into a pan and bring it to the boil, and saves time and hassle in the sleepy morning. The second is to leave the pan of porridge to sit with the lid on for 2-3 minutes before you serve it, before giving it a good stir with a silicone spatula or spoon to mix in the thicker layer at the bottom of the pan. Use the spatula to serve the porridge then quickly run the pan under the cold tap to rinse off any remaining scraps and you will never have to soak gluey porridge from the bottom of a pan ever again.

No doubt you can do all of this in the microwave, but it just doesn’t conjure the same comforting atmosphere of home as a pot of porridge steaming on the stove. Besides, putting the porridge on at night reminds me of staying with my grandmother, who used to set the breakfast table before she went to bed every night. So, for me, cooking porridge on the stove is definitely worth the extra few minutes it takes. You can still have breakfast on the table in little over 10 minutes.

We use Mornflake medium oatmeal, and our favourite porridge toppings are apple compote, a handful of blueberries and some nuts and seeds to add crunch. A drizzle of maple syrup on top, and a banana sliced into the bottom of the bowl add extra fuel when facing particularly miserable mornings. I add yoghurt, which I realise is a bit weird, but we don’t often have milk in the fridge and cream would definitely seem too indulgent. Quantities are for two – if multiplying up you’ll find you don’t need quite as much but, as any Scot will tell you, leftovers can easily be heated up for the morrow so you may want to cook up enough for a few days anyway. A reminder that these are American cup measures, though it doesn’t matter if you don’t have them, as the key thing is to use the same measure for oats and water, so that the proportions stay the same, and to find a cup that produces the right amount of porridge for you.

½ cup medium oatmeal
2½ cups water
a pinch-½ tsp salt, to taste
Optional toppings:
apple compote
blueberries
chopped nuts
mixed seeds
drizzle of maple syrup

Putting porridge on the night before

Measure the oats and water into a medium saucepan and add salt to taste. I am trying to cure myself of a tendency to under-salt everything (see previous post about the influence of Samin Nosrat) but how salty you like your porridge is a matter of personal taste. At this stage it will look far too thin and as if it will never turn into porridge. Stir with a spurtle or wooden spoon and bring to the boil. Then turn off the heat, clamp on the lid and go to bed.

IMG_4891
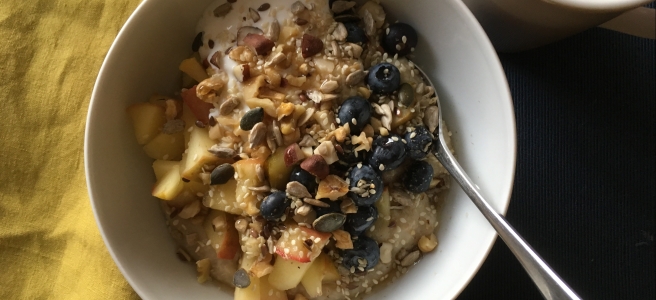
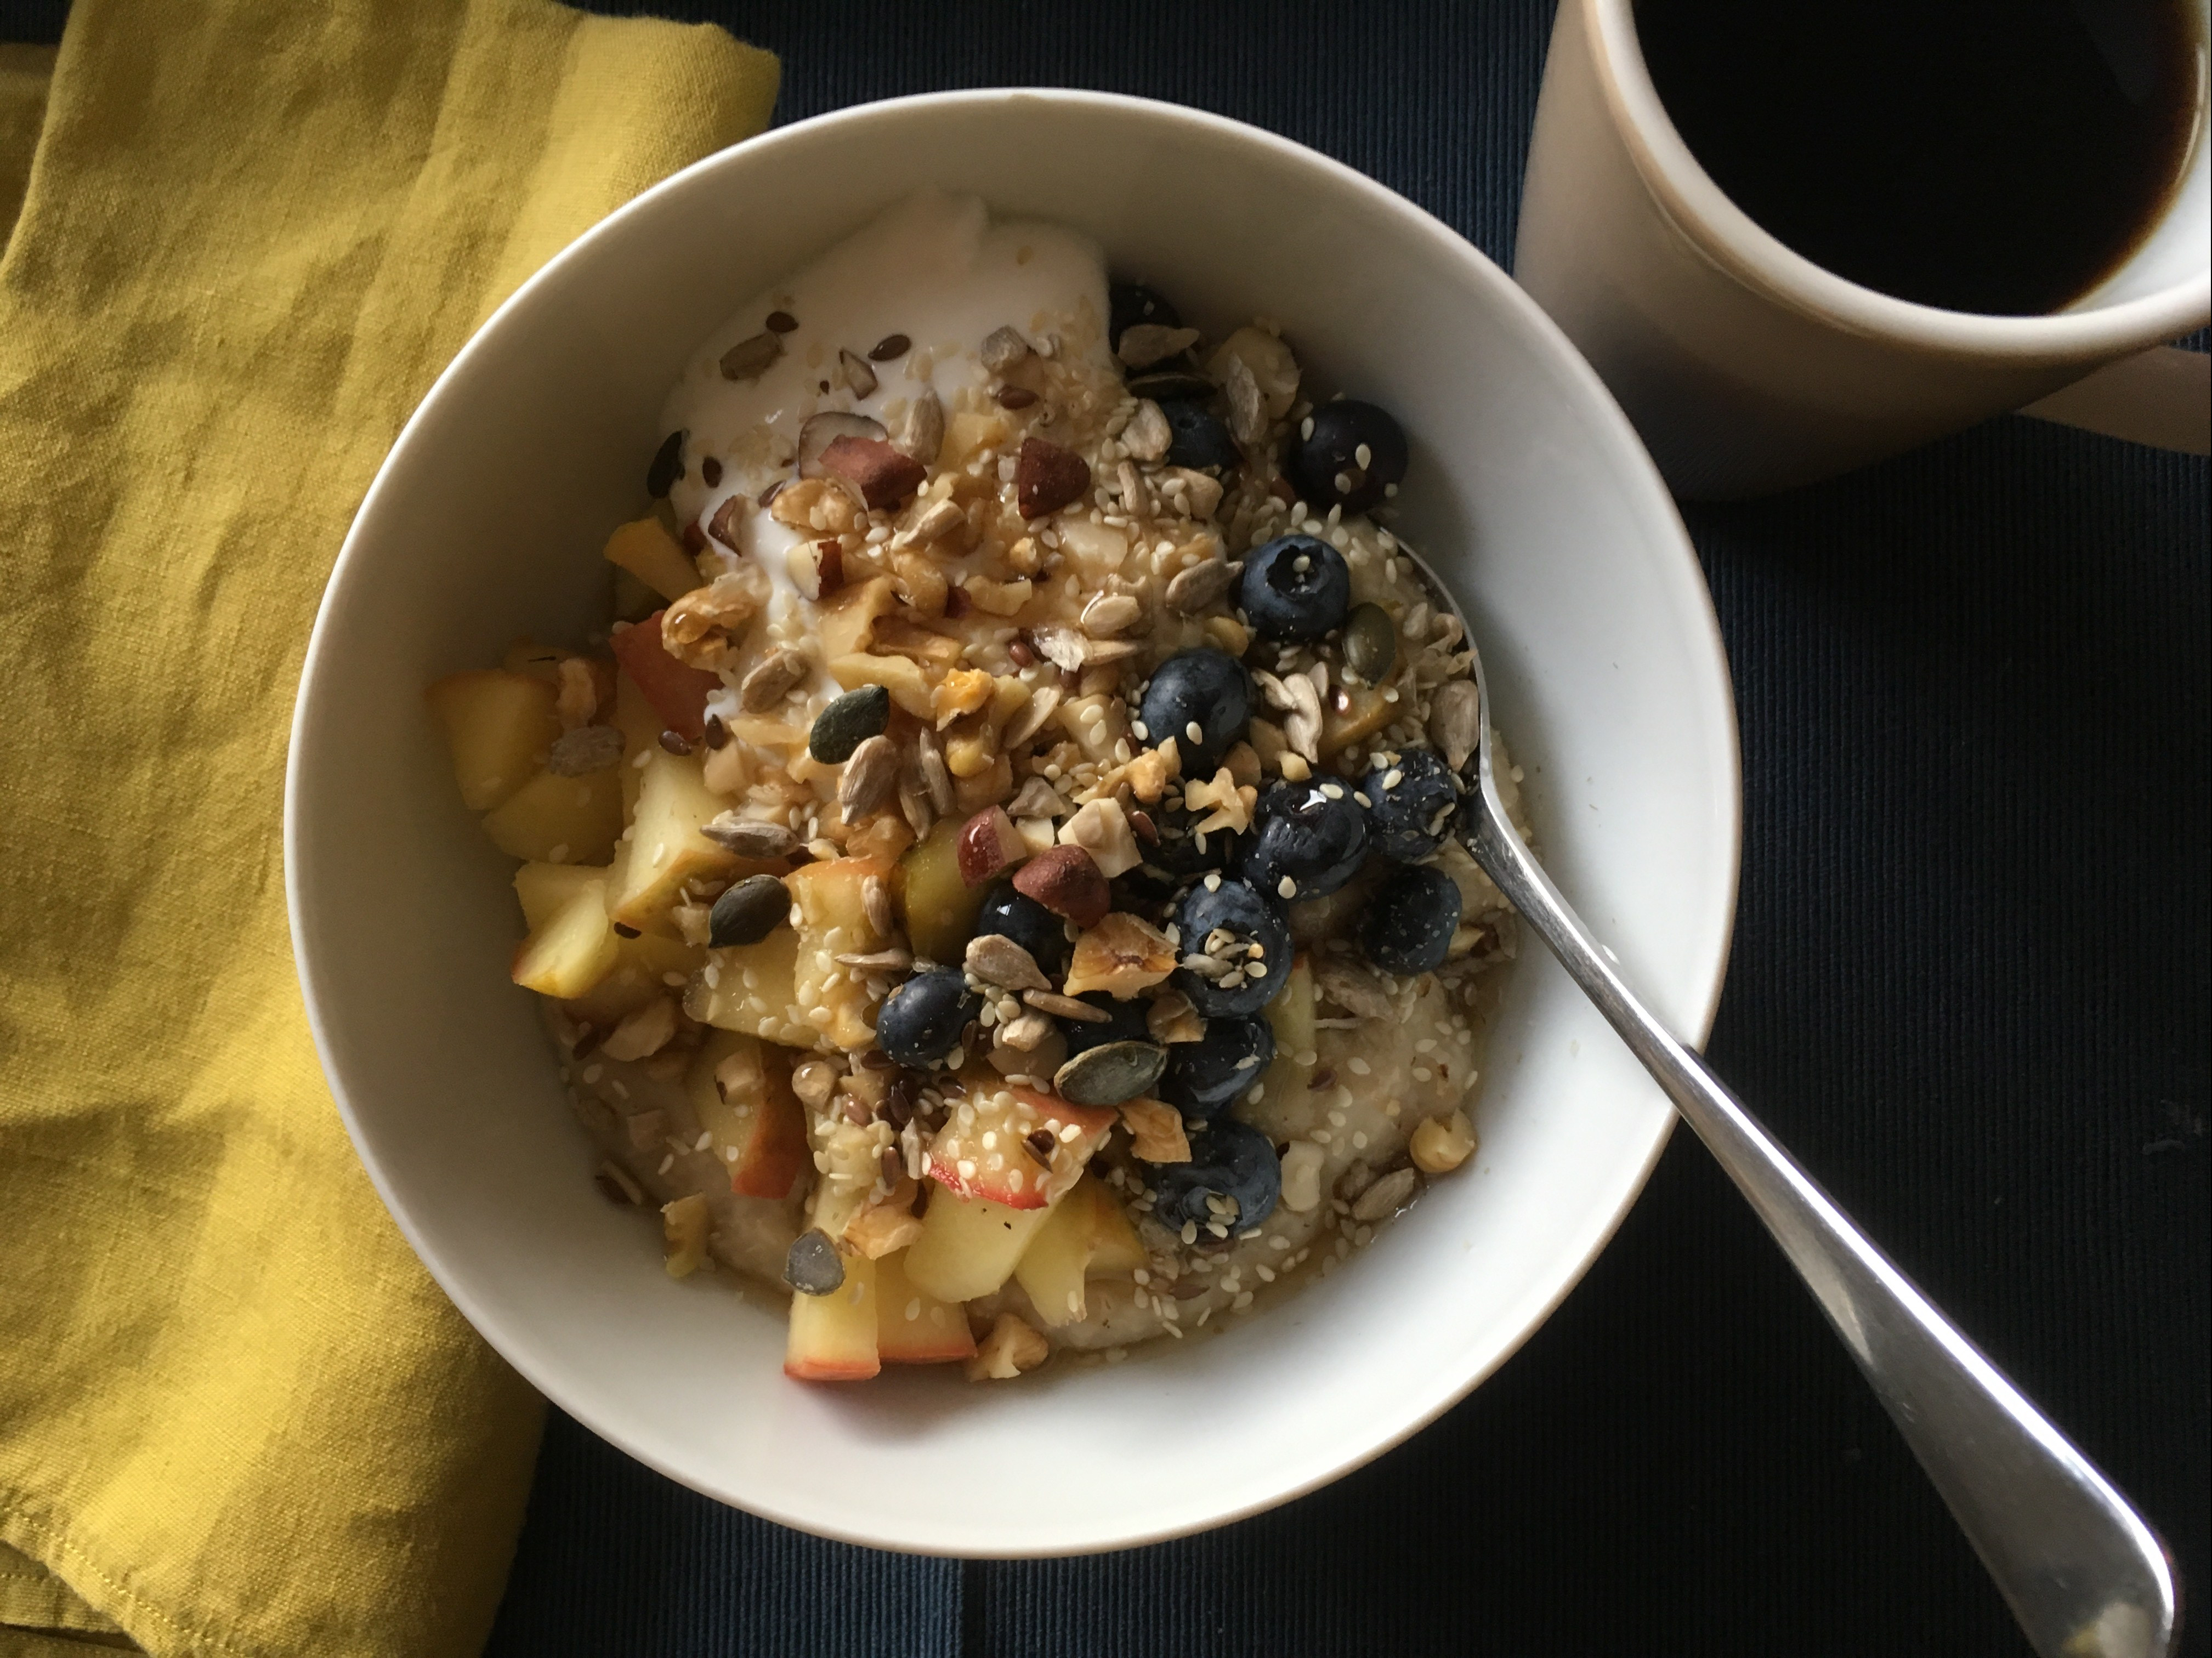
In the morning, you will find it has thickened and looks much more promising. Gently bring the pan back to a simmer, stirring diligently. Don’t forget to stir the porridge when you put it back on the heat, or it will, I promise you, stick and burn (I made this mistake – once!). Then put the timer on for 6 minutes, and busy yourself with making coffee or apple compote (see below), turning back to stir the porridge every couple of minutes. You may need to turn the heat down so that it stays at a steady simmer and doesn’t erupt into an angry impersonation of the mud baths in Rotorua.

When the pinger goes, give the porridge a good stir and decide whether you think it is the right consistency or needs an extra minute or two. Once you are happy, put on the lid, turn off the heat and leave it for 2-3 minutes, while you prepare your toppings.

Porridge with apple compote, blueberries, nuts and seeds

You can make a quick apple compote while the porridge is cooking. Just chop an eating or Bramley apple into dice, rinse and simmer it in the water clinging to the apple for 5 minutes. As you can see, if I’m using eating apples I leave the skin on, but generally peel Bramleys, to get that distinctive, fluffy consistency. You can add a teaspoon of sugar to the Bramleys if you like, but I like their tartness – especially if you’re going to add some maple syrup. The compote can, of course, be made in a batch at the weekend, or the night before, if you find the mere thought of chopping apples in the morning tiring.

Wash some blueberries, chop a handful of nuts and you’re ready to scoop the porridge into bowls, add the fruit and nuts, scatter over a teaspoonful of seeds and add dairy (or a vegan equivalent), if you wish. Finish with a drizzle of maple syrup and enjoy your proper porridge. You can almost feel it setting you up for whatever the day holds.

Shakshuka: eggs with peppers and tomatoes

ShakshukaThis cheering dish of eggs on a bed of spicy pepper and tomato sauce is perfect for brunch or a homely lunch. After a morning of errands, we were restored by a dish of shakshuka eaten with a loaf of the excellent sourdough from the Quality Chop House shop.

If entertaining, you could cook the vegetables ahead of time, then just reheat and add the eggs when you’re ready to eat. These quantities are for two, if eating it on its own for lunch, but would feed four as part of a brunch menu.

1 red onion
1 red pepper
1 green pepper
1 leek
1 tbsp olive oil
1 clove garlic
½-1 red chilli
1 tin tomatoes
salt and pepper
4 eggs
coriander or parsley to serve

Peel, halve and slice the red onion, and trim and slice the leek. The leek is strictly unorthodox, but is a nice addition. Remove the core and seeds from the peppers and slice into thin strips – you could use two red peppers, or red and yellow ones if you prefer. The peppers I used were quite small, so you might find one big one is enough. Heat the olive oil in a large frying pan with a lid. Add the onions, then the leeks, and cook over medium heat for a few minutes, stirring from time to time to make sure they don’t catch. Peel and mince the garlic and add to the pan.

The amount of chilli you use depends on how much heat you like and how hot your chillies are – I used half a small hot chilli, chopped and with most of the seeds taken out. You could also use chilli powder if you don’t have a fresh chilli to hand. Add the chilli and sliced peppers to the pan and continue to cook for about five minutes until they are starting to soften. Add the tomatoes – but not the juice from the can – and crush them into the vegetables. Cover the pan and simmer for 10 minutes. You can prepare it ahead up to this point, in which case be sure to heat the vegetables through before you add the eggs.

The vegetables should all have softened and amalgamated. Make four indentations in the top of the sauce, and crack an egg into each one. Cover the pan and cook over medium heat for about 5 minutes, to give firm whites and slightly soft yolks – however, this will vary according to your pan and stove, so keep an eye on them, and you will need longer if you like your yolks cooked through.

Chop a handful of coriander leaves or parsley and sprinkle over before serving with some good bread to mop up the delicious sauce.


Buckwheat pancakes

Buckwheat PancakeAs Shrove Tuesday, pancake day, falls this week (on Tuesday 9 February), I thought I would post my current favourite pancake recipe – a Breton buckwheat galette. I have always had a weakness for the crèpes you buy at the little market or street stalls in Paris, filled with crème de marrons, and I used to love the traditional thin pancakes my mother cooked for Shrove Tuesday, eaten hot from the pan with just lemon juice, sugar and butter. These days, though, I find they rarely live up to that childhood memory, and I prefer the taste of these buckwheat pancakes. Moreover, these are wheat and gluten-free, so ideal for those who are on gluten-free diets, and you can use water instead of milk. Filled with spinach and cheese, with or without a poached (or fried) egg, they make a great brunch, lunch or supper dish. With a slice of ham, some grated gruyère and an egg you have a Galette Complète – the Breton equivalent of British bacon and eggs.

I made them again recently because I found a packet of Farine de Sarrasin (aka buckwheat flour), bought the last time I was in Brittany, which needed using up. That sent me looking for my Breton cookbook – I found this recipe, but not a single one for a galette. Then I looked online and found a David Leibowitz recipe, but it uses a combination of buckwheat and plain flour, which wasn’t going to help me use up the buckwheat flour. So I based my recipe on the one on the packet of flour. Remember that you need to mix the batter at least a couple of hours ahead – or better still the night before you need it. This quantity makes enough for two savoury galettes with enough over to serve smaller galettes with a sweet topping (see below) for dessert.

125g buckwheat flour
1 egg, beaten
1 tbsp olive oil or melted butter
salt
250ml water or milk
20g butter for cooking

For savoury filling:
200g spinach
grated nutmeg
100g goat’s cheese or gruyère
2 eggs
2 slices of honey-roast ham (if desired)

Put the flour in a bowl and make a well in the centre. Pour the beaten egg into the well along with the oil or melted butter and a couple of grinds of salt. Gradually work them into the flour with a spatula, starting from the centre and adding the water or milk gradually until the batter has the consistency of double cream. Beat the batter briskly with a whisk for about 3 minutes until it is smooth and there are no lumps. Leave the batter to rest for 2 hours or overnight in the fridge.

To prepare the galettes take the batter out of the fridge and let it come to room temperature. Prepare the spinach: wash the leaves and cook them in a saucepan over medium heat, covered with a lid, in the water that clings to the leaves after washing. Stir once or twice until the spinach has all wilted – this should only take 3 or 4 minutes. Take off the heat, press the spinach with the back of a wooden spoon to squeeze out the excess liquid and stir in a good nut of butter, season with salt, pepper and nutmeg, and put over very low heat to keep warm. Fill a small pan half full of water, and put a piece of kitchen towel on a plate or small board. Grate the gruyère or if using goat’s cheese cut it into small chunks.

Turn the oven on low (about 120ºC) and put two plates in to warm. Put a large solid frying pan or crèpe pan, preferably non-stick, over a medium-high heat. If you wish, you can cook all the galettes and then warm them up when you’re ready to eat them, which is probably sensible, but I never do this as I think they taste best as fresh as possible.

Turn the heat on under the pan of water and crack the first egg into a cup. When the pan of water reaches a simmer, slip the first egg into the water, turn down the heat so that just the odd bubble rises to the surface and poach the egg until the egg white is set (about 3 minutes). Take out of the pan with a slotted spoon and put to drain on the kitchen towel you have put ready. Cook the other egg in the same way (you can use these poachies, which I’m told are very good and make it easier to cook two eggs at once).

Give the buckwheat batter a good stir and thin with a little more water or milk if necessary, as it may have thickened after standing – it should be the consistency of double cream. When the pan is hot put in a good knob of butter and swirl it round the pan – use a paper towel to wipe the butter around the pan if necessary. Pour a ladleful of batter into the pan and immediately tip the pan to spread it as thinly as you can. The professionals use a dinky wooden utensil for this, and I find a straight-ended wooden spatula very useful to spread the batter thinly and evenly around the pan.

When the underside of the first galette is cooked and releases easily from the pan (a minute or two) turn it over and cook the other side. Put the first galette onto a warm plate in the low oven. Add another nut of butter to the pan and cook the second galette in the same way.

When both galettes and eggs are cooked, put a slice of ham (if using) in the centre of each galette, mix the cheese into the spinach, add half the mixture to each and top with a poached egg. Fold the edges of the galette in to enclose the filling like a little parcel and serve.

When you’re ready for dessert use the remaining batter to make two more galettes and fill them with, for example:

  • warm stewed plums with vanilla ice-cream
  • sliced apples cooked briefly in a little butter and a tbsp of Calvados, ideally served with salted caramel sauce, or maple syrup
  • Crème de marrons with whipped cream (the French would whip in a little icing sugar to turn it into crème Chantilly)

I tend to serve the sweet pancake either open or just folded in half, rather than folded like a parcel.

The traditional drink with galettes is cider, but I find wine or apple juice go just fine too. Then retire to the sofa and plan your next holiday in Brittany…

Sweet potato pancakes

Sweet Potato Pancakes


Now, here’s an Ottolenghi recipe from Nopi which is just the thing for a wet, gloomy November day – a 2015 version of the fluffy American-style pancakes that our family friend Balazs used to serve on Saturday mornings with strong coffee and heated political debate.

700g sweet potatoes (2 medium)
200g plain flour
2 tsp baking powder
1 tap grated nutmeg
1 tsp ground cinnamon
3 eggs, separated
150ml full-fat milk
50g butter melted plus 50g for frying
1 tsp vanilla extract
1 tbsp runny honey

To serve:
Greek yoghurt
Date or maple syrup

Preheat the oven to 220°C Fan and bake the unpeeled sweet potatoes on a tray lined with baking paper for about 40-50 mins until the flesh is soft and the skin shrivelled. I cooked them for 40 mins and left them to finish cooking in the cooling oven.

When cool, peel off the skin, and squeeze the flesh in a piece of muslin (or, in my case, an underused jelly bag) to extract any liquid. You should end up with around 320g sweet potato purée.

Mix together the dry ingredients with a little salt. Whisk together the egg yolks, milk, melted butter, vanilla and honey in a separate bowl and then fold into the dry ingredients, and stir in the sweet potato. Whisk well until smooth. [you can make ahead to this point]

Heat oven to 160°C Fan. Whisk the egg whites until stiff and gently fold into the potato mix.

Heat a good nut of butter in a large frying pan over medium-hot heat. Use 2 tbsp of the mixture for each pancake – you should be able to get 3 in the pan. Cook for about 2 mins (my first batch took a little longer) until bubbles appear in the middle and they are lightly browned underneath. Turn carefully and cook for a further 1-2 mins.

Transfer to a warm dish in the oven while you cook the remainder, adding a fresh nut if butter between each batch.

Serve topped with yoghurt and a drizzle of syrup (with bacon on the side for carnivores. We think roast field mushrooms would be good with them too if you’re feeding vegetarians).

Nasi Goreng

Nasi Goreng IMG_4512

This is Irene’s recipe for Indonesian Fried Rice, learnt from her mother, who grew up in the Dutch East Indies. In Indonesia it was eaten for breakfast, but it is great comfort food at any time of day. Apparently, the Dutch started using bacon to provide fat to fry the onions after the war when it was hard to get oil. In colonial days pork was more regularly eaten in Indonesia, which is no longer the case, as it is now a more strictly Muslim country. Nasi Goreng turns leftover rice into a delicious new meal, and is an economical way to feed a crowd. We recently served it for brunch with Begedel Djagung (sweetcorn patties), crunchy Thai Cashew Salad and steamed tenderstem broccoli and sugar snaps – a great success.

Nasi Goreng can largely be  prepared in advance, making it very convenient for entertaining. To turn it into a more substantial meal you can add prawns, shredded omelette, or cooked chicken or pork to it, or serve it with Tomato and Prawn Curry or Babi Ketjap (pork with sweet soy sauce). If you haven’t got any leftover rice, cook the basmati rice in advance (see How to Cook Perfect Rice). These quantities are for 3 to 4 (depending on what you’re serving it with).

120g smoked bacon lardons or pancetta
1 medium onion, roughly chopped
1 large clove garlic, crushed
1 red chilli, finely chopped
2 ‘thumbs’ of ginger, peeled and finely chopped
scant ¼ tsp ground cumin
rounded ½ tsp ground coriander
Knife point of fish paste
½ tsp Sambal Badjak Extra Heet (optional)
1 egg
salt and pepper
240g basmati rice, cooked

Optional toppings:
2 spring onions, finely sliced
2 cm cumcumber diced or chopped into logs
thin omelette, made from 1 egg, rolled and sliced
cooked and shredded chicken or pork

Heat a large frying pan (preferably non-stick) over fairly high heat (7 on my cooker). When pan is hot add the bacon, turn heat down to 6 and cook, stirring occasionally, until the bacon is starting to colour and any moisture has evaporated. Meanwhile prepare the garlic (here I’ve used this handy little dish with sharp ridges which quickly reduce the garlic to a paste), chilli and ginger.
IMG_1126IMG_1127
Add the chopped onion, turn the heat down a bit more (to 5 or 4) and let it cook slowly, stirring from time to time, until the onion is soft and golden – about 8-10 minutes. Stir in the garlic, ginger, chilli, fish paste, cumin and coriander, and cook gently for about 5 minutes – it is important that these ingredients are cooked properly before you go on to the next step. If using, add the Sambal Badjak at this stage – it is not essential, but adds a deeper chilli note and a bit of colour. Break the egg into the pan and stir it in, as if you were scrambling it, so that you get strands of cooked white and cooked yolk through the mixture. Season with salt and pepper. You can prepare this in advance and set it aside at this point.

IMG_1128

When you are ready to eat, heat the bacon mixture over medium heat, add the cooked rice, stir together thoroughly and garnish with chopped spring onion and other toppings as required.


IMG_1130

Today we served the nasi goreng for lunch with Tomato and Prawn Curry, sugar snaps, and a garnish of chopped cucumber and a bit of coriander (though the latter is most unorthodox, I’m told).

Goats’ milk yoghurt

When we were growing up we had a yoghurt maker – it looked a bit like a space-ship, with a circular heated base and a domed glass top. Inside were 6 small curvy glass jars with yellow lids – altogether a rather pleasing design and I wish it had not been lost over the years. It was fun to use and we made our own delicious yoghurt all the time, which was useful given that it was harder to get plain, unsweetened yoghurt in the shops then.

In a spirit of nostalgia, I thought I’d have a go at making my own yoghurt again, and found this very useful article by Phil Daoust in the Guardian. I really like goats’ yoghurt, so followed his method using goats’ milk and the excellent yoghurt made by St Helen’s Farm.

You need a thermometer, a wide-mouthed thermos and some jars for the finished yoghurt.

500ml goats’ milk
3tbsp live goats’ yoghurt

IMG_1073Fill your thermos with hot water. Heat milk to 85ºC, stirring occasionally, then leave to cool to 46ºC and whisk or stir in the yoghurt. Drain the thermos and pour in the mixture. Seal and leave for at least 8 hours. Pour it into clean jars and store in the fridge. Phil Daoust recommends adding 25g powdered milk to every 500ml of milk, which makes a creamier yoghurt, but I haven’t tried this, as Waitrose does not yet run to powdered goats’ milk!

My first effort was quite runny and mild, so I think next time I might leave it a bit longer, to see if I can produce something a bit closer to the original yoghurt (don’t think St Helen’s Farm have anything to worry about at the moment). There is something very satisfying about doing this – rather in the same way that making bread is satisfying.

Granola

This recipe was given to me by my sister-in-law Judy, and came from Sainsbury’s magazine. I have adapted it a bit (the original had coconut in, which Irene doesn’t like). As well as eating it with fruit and yoghurt for breakfast, we really like it as a crunchy topping for stewed apples or plums, with greek yoghurt, cream or ice-cream, as a dessert. Photograph shows a batch made with 300g oats, 35g seeds & 150g honey. If using two trays you need to rotate them in the oven to get them evenly browned.

Granola

425g rolled oats
50g sunflower seeds
50g pumpkin seeds
225g nuts (I use brazils, almonds and walnuts, chopped roughly – can also include pine kernels, pistachios and pecans)
250g runny honey (I use less – about 200g)

Preheat oven to 200º/Gas 6. Mix all ingredients together so everything is lightly coated in honey. Tip into roasting tins and bake for 15 mins, stirring every 5 mins so the nuts don’t burn. Should be toasted golden brown when ready.

Can mix in 225g dried fruit (blueberries, sultanas, cranberries, cherries) when cool. Store in airtight container.